
There’s something undeniably nostalgic about grilled cheese sandwiches. They bring back memories of rainy afternoons, when everything felt right in the world with a gooey sandwich and a bowl of warm tomato soup. But what if I told you there’s a way to embrace that comfort food feeling and kick it up a notch? Enter the Smashburger Grilled Cheese — a harmonious blend of juiciness, melty cheese, and that irresistible crunch. This recipe combines all the goodness of a classic grilled cheese with the satisfying heart of a burger. When I first tried this, I felt like a kid again, but with the added adult thrill of flavorful beef and a gourmet touch. Let me share with you how to make this decadent creation at home.
Recipe Timing
- Prep Duration: 15 minutes
- Active Cooking: 20 minutes
- Total Duration: 35 minutes
- Portion Size: Serves 4
- Complexity: Simple
Nutritional Recipe
- Calories per portion: Approximately 820
- Protein: 47g per serving
- Carbs: 42g per serving
- Fats: 51g per serving
- Fiber: 2g per serving
- Sugars: 4g per serving
- Sodium: 1,200mg per serving
Why You’ll Love This Smashburger Grilled Cheese
This isn’t just any grilled cheese; it’s a grilled cheese with a twist. Craving something hearty? The rich ground beef topped with ooey-gooey cheese and a splash of Smashburger sauce gives it that signature ‘smash’ flavor. You have crispy bread embracing layers of flavor — the savory beef, melty American and Havarti cheeses, and a zing of dill pickles. Each bite is a nostalgia-laden trip down memory lane, enhanced by a little savory magic.
The Complete Cooking Journey
Imagine the moment you lift that crispy sandwich from the pan, revealing the luxurious layers of ingredients ready to be devoured. Picture the sizzle of ground beef and the aroma wafting through your kitchen. The satisfaction of biting into that warm, cheesy heaven is nothing short of euphoric. So, what are we waiting for? Let’s dive into the journey of making this epic Smashburger Grilled Cheese!
Ingredients:
- 1 lb Ground Beef
- 1 small Onion (thinly sliced)
- 1/2 cup Smashburger Sauce
- 8 slices Hearty White Bread
- 8 slices American Cheese
- 2 cups Havarti Cheese (shredded)
- 1/3 cup Sliced Dill Pickle Chips
- 2 tbsp Salted Butter
- Kosher Salt (to taste)
- Fresh Cracked Pepper (to taste)
Method:
Step 1: Prepare Your Ingredients
Start by gathering all your ingredients. Slice the onion thinly and have your cheeses measured and ready. This will help streamline the cooking process and ensure you don’t miss a beat!
Step 2: Sauté the Onion
In a skillet over medium heat, melt a pat of butter and toss in the sliced onions. Sauté them for about 5 minutes until they become tender and caramelize, unlocking their natural sweetness. Set them aside for later.
Step 3: Cook the Ground Beef
Using the same skillet, add the ground beef, breaking it apart with a wooden spoon. Season it with kosher salt and fresh cracked pepper to taste. Cook until browned, about 7-10 minutes. Drain any excess fat if necessary. Stir in the Smashburger sauce for those juicy, robust flavors.
Step 4: Assemble the Sandwich
Time to layer up! On one slice of hearty white bread, add a slice of American cheese as the first layer, followed by a generous scoop of the beef mixture, sautéed onions, shredded Havarti cheese, and a few dill pickle chips. Finish with another slice of American cheese. Top it off with a second slice of bread.
Step 5: Grill It Up
In the same skillet, melt a tablespoon of butter over medium-low heat. Carefully place the sandwich in the skillet, cooking for about 4 minutes until golden brown. Flip carefully and add the remaining butter to the pan. Cook until the other side is equally golden with all that cheese melted inside.
Step 6: Slice and Serve
Once golden brown and crispy, remove the sandwich from the skillet. Let it rest for a minute (if you can resist!), then slice it in half, revealing the melty, delectable filling.
Serving Suggestions & Pairings
Pair this delicious Smashburger Grilled Cheese with a crunchy side salad or your favorite fries for an indulgent, complete meal. For those classic vibes, a creamy tomato soup also serves as the perfect accompaniment.
Storage & Leftovers Guide
If you have leftovers (which is unlikely!), store the grilled cheese wrapped in foil in the fridge for up to 2 days. Reheat in a skillet to regain that crunchy texture.
Kitchen Wisdom & Success Tips
- Don’t rush the cooking of the onions; proper caramelization adds depth!
- Use a mix of cheeses for added flavor if you’re feeling adventurous.
- Adjust the seasonings to your preference; maybe add some garlic powder or paprika for a twist.
Flavor Variations & Adaptations
- Swap in different cheeses; gouda or cheddar can add a delightful touch.
- For a spicier kick, add jalapeños or a dash of hot sauce to the beef mixture.
- Make it vegetarian by substituting the beef with a hearty plant-based protein!
Reader Questions & Solutions
- What can I do if my cheese isn’t melting? Try lowering the heat and placing a lid on the skillet for a minute to trap heat.
- Can I make this without Smashburger sauce? Absolutely! Try mixing mayo with a splash of sriracha for a tangy kick.
- How do I know when my meat is cooked? Ground beef should be brown with no pink remaining. Use a meat thermometer for perfection—160°F is your benchmark!
- Can I make this ahead of time? Yes! Prepare the beef mixture and store it in the fridge. Assemble and grill just before serving.
- What bread should I use? Hearty white bread is superb, but any thick-sliced bread will do!
Wrapping Up
The Smashburger Grilled Cheese isn’t just a recipe; it’s a celebration of comfort food, childhood memories, and the joy of indulgence. As you dive into this culinary adventure, I hope it brings a smile to your face, just like it did for me. The blend of flavors and textures will remind you why food holds such an important place in our hearts. So gather your ingredients, fire up that skillet, and savor every delicious bite! Happy cooking!
PrintSmashburger Grilled Cheese
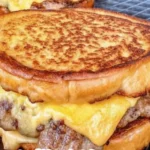
A nostalgic grilled cheese sandwich with a twist, featuring juicy ground beef, melty cheeses, and a blend of delicious flavors.
- Prep Time: 15 minutes
- Cook Time: 20 minutes
- Total Time: 35 minutes
- Yield: 4 servings 1x
- Category: Main Course
- Method: Grilling
- Cuisine: American
- Diet: Non-Vegetarian
Ingredients
- 1 lb Ground Beef
- 1 small Onion (thinly sliced)
- 1/2 cup Smashburger Sauce
- 8 slices Hearty White Bread
- 8 slices American Cheese
- 2 cups Havarti Cheese (shredded)
- 1/3 cup Sliced Dill Pickle Chips
- 2 tbsp Salted Butter
- Kosher Salt (to taste)
- Fresh Cracked Pepper (to taste)
Instructions
- Prepare Your Ingredients: Start by gathering all your ingredients. Slice the onion thinly and have your cheeses measured and ready. This will help streamline the cooking process and ensure you don’t miss a beat!
- Sauté the Onion: In a skillet over medium heat, melt a pat of butter and toss in the sliced onions. Sauté them for about 5 minutes until they become tender and caramelize, unlocking their natural sweetness. Set them aside for later.
- Cook the Ground Beef: Using the same skillet, add the ground beef, breaking it apart with a wooden spoon. Season it with kosher salt and fresh cracked pepper to taste. Cook until browned, about 7-10 minutes. Drain any excess fat if necessary. Stir in the Smashburger sauce for those juicy, robust flavors.
- Assemble the Sandwich: Time to layer up! On one slice of hearty white bread, add a slice of American cheese as the first layer, followed by a generous scoop of the beef mixture, sautéed onions, shredded Havarti cheese, and a few dill pickle chips. Finish with another slice of American cheese. Top it off with a second slice of bread.
- Grill It Up: In the same skillet, melt a tablespoon of butter over medium-low heat. Carefully place the sandwich in the skillet, cooking for about 4 minutes until golden brown. Flip carefully and add the remaining butter to the pan. Cook until the other side is equally golden with all that cheese melted inside.
- Slice and Serve: Once golden brown and crispy, remove the sandwich from the skillet. Let it rest for a minute (if you can resist!), then slice it in half, revealing the melty, delectable filling.
Notes
Pair this with a crunchy side salad or fries, or enjoy with creamy tomato soup. If you have leftovers, store wrapped in foil in the fridge for up to 2 days.
Nutrition
- Serving Size: 1 sandwich
- Calories: 820
- Sugar: 4g
- Sodium: 1200mg
- Fat: 51g
- Saturated Fat: 20g
- Unsaturated Fat: 25g
- Trans Fat: 0g
- Carbohydrates: 42g
- Fiber: 2g
- Protein: 47g
- Cholesterol: 120mg