
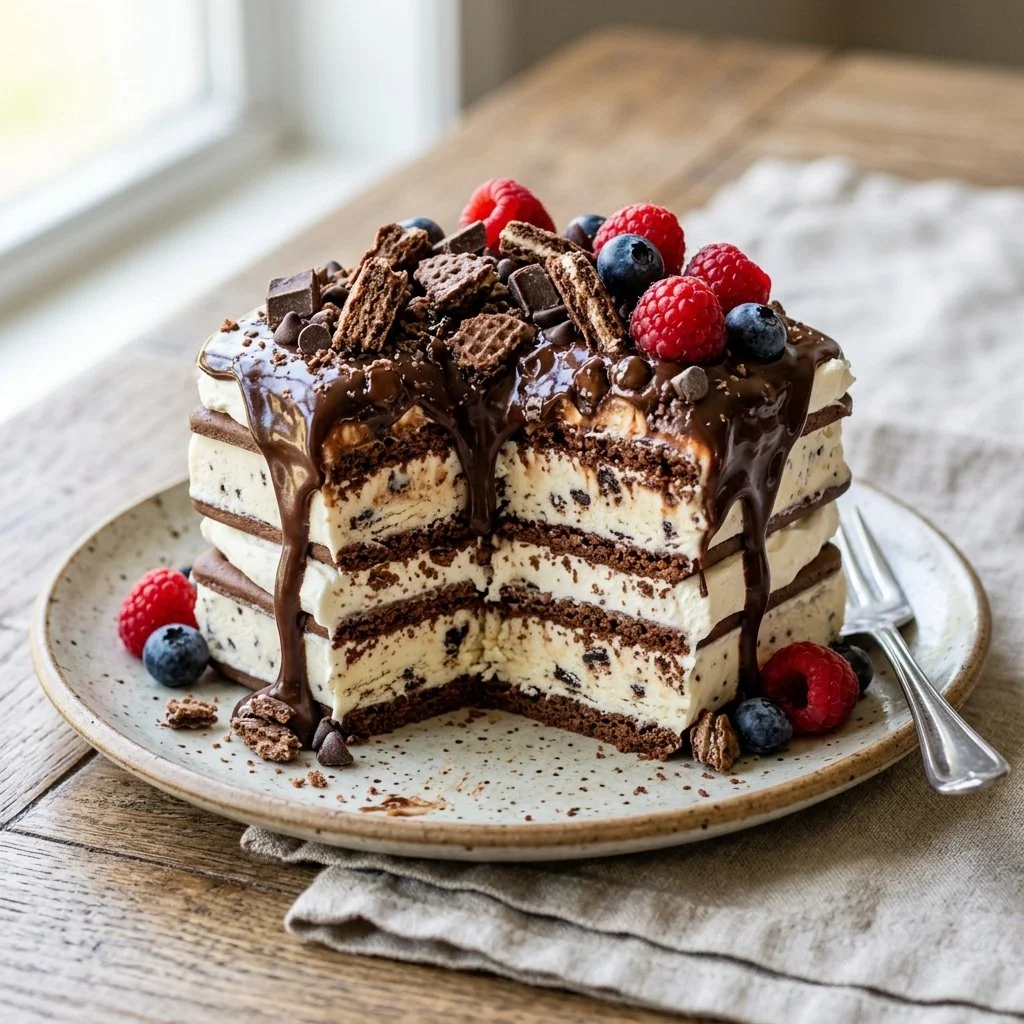
The summertime sun blazes down, coaxing the vibrant green of the garden to life. It’s the warm afternoons surrounded by laughter, a clinking of glasses, and the mingling scents of playful kitchens that stand out most. Memories of childhood come flooding back as I recall the delight of sinking my teeth into a classic ice cream sandwich—cool, creamy filling snuggled between two soft cookies. There’s something magical about that taste, evoking pure joy on a hot day.
As the years rolled forward, the concept of the ice cream sandwich evolved in my kitchen, leading me to a delightful creation: the Ice Cream Sandwich Cake. This dessert takes all the nostalgic flavors we adore, combines them into a rich, layered masterpiece, and transforms any mundane gathering into a celebration. Ready to impress your friends and family? Grab your apron and let’s dive into this delightful summer treat!
Recipe Timing
- Prep Duration: 15 minutes
- Active Cooking: 0 minutes (no baking required!)
- Total Duration: 2 hours 15 minutes (includes freezing time)
- Portion Size: Serves about 12
- Complexity: Simple
Nutritional Recipe
- Calories per portion: Approximately 245
- Protein: 2 grams per serving
- Carbs: 36 grams per serving
- Fats: 10 grams per serving
- Fiber: 1 gram per serving
- Sugars: 16 grams per serving
- Sodium: 135 mg per serving
Why You’ll Love This Ice Cream Sandwich Cake
This Ice Cream Sandwich Cake is a game changer! Not only does it offer the familiar flavor combinations we love, but it comes together in a snap. The beautiful layers create an impressive dessert that looks as good as it tastes. It’s foolproof, fun, and can be tailored to your taste preferences! You can let your creativity shine by choosing your favorite flavors and toppings. Plus, it’s a dessert that everyone—from the little ones to the grandparents—will rave about!
The Complete Cooking Journey
Creating this cake is as easy as layering! Imagine fluffy whipped topping, gooey hot fudge, and a crunchy cookie topping. Together, they create mouth-watering harmonies of flavor that will have your guests returning for seconds and thirds. The anticipation builds as you pop it in the freezer, knowing that soon, it will be time to slice into this heavenly treat.
Ingredients:
- 12 ice cream sandwiches
- 1 tub (8 oz) whipped topping, thawed
- 1 cup hot fudge sauce
- 1 cup crushed cookies (e.g., Oreos or chocolate wafer cookies)
- Sprinkles or chocolate shavings for garnish
Method:
Step 1: Assemble the First Layer of Ice Cream Sandwiches
Arrange half of the ice cream sandwiches in a 9×13 inch baking dish, creating a solid base for your cake.
Step 2: Spread the Whipped Topping
Spread half of the whipped topping evenly over the sandwiches, adding a fluffy layer of sweetness.
Step 3: Drizzle the Hot Fudge Sauce
Drizzle half of the hot fudge sauce over the whipped topping, allowing the rich chocolate to sink in slightly.
Step 4: Repeat the Layers
Repeat the process with the remaining ice cream sandwiches, spreading the last bit of whipped topping, followed by the final drizzle of hot fudge sauce.
Step 5: Add Crunch and Color
Top it off with a generous sprinkle of crushed cookies and colorful sprinkles or chocolate shavings to create a festive look.
Step 6: Freeze to Perfection
Cover the dish and freeze for at least 2 hours before serving. This helps solidify all the layers into one cohesive and delicious cake.
Step 7: Slice and Enjoy!
Once it’s fully frozen, slice into squares and serve up happiness on a plate!
Serving Suggestions & Pairings
This cake is perfect for any occasion, whether it’s a summer barbecue, a birthday party, or just a fun family dessert night. Pair it with fresh fruit, like berries or sliced bananas, for a refreshing contrast. Drizzle on extra fudge sauce for chocolate lovers or a scoop of vanilla ice cream for an indulgent treat.
Storage & Leftovers Guide
Keep any leftovers covered in the freezer for up to a week. Just be sure to slice the pieces you plan to serve, as it freezes solidly. Thaw a bit at room temperature for about 10 minutes before slicing for perfectly clean cuts.
Kitchen Wisdom & Success Tips
- Make sure your whipped topping is fully thawed for smooth spreading.
- Use any flavor of ice cream sandwiches you love—cookie dough, mint chocolate chip, or classic vanilla.
- If you want a bit more crunch, go heavy on the cookie topping!
- Always let it freeze full enough to slice easily; a minimum of 2 hours is essential.
Flavor Variations & Adaptations
Feel free to switch it up! Try swapping the hot fudge with caramel sauce or a fruit compote for a refreshing twist. Add layers of different flavored ice cream sandwiches for delightful surprises in every bite!
Reader Questions & Solutions
-
Can I use homemade whipped cream?
Absolutely! Make sure it’s stabilized so it holds its shape during freezing. -
What if I don’t have a 9×13 pan?
You can use any deep dish—just adjust the layers accordingly; a round cake pan works great too! -
Can I make this ahead of time?
Yes! It stores well in the freezer for a week, making it perfect for advanced prep. -
How do I know when it’s ready to serve?
It should be solid and hold its shape without being rock hard. About 10 minutes at room temperature before serving ensures it’s perfectly sliceable. -
Can I make a mini version?
Definitely! Use smaller ice cream sandwiches and individual serving dishes for a fun twist.
Wrapping Up
This Ice Cream Sandwich Cake is more than a dessert; it’s a celebration of flavors, memories of joy, and the comfort of simplicity. From preparation to that first delicious bite, it encapsulates everything we love about summer desserts. So gather your loved ones, whip out that baking dish, and create a treat that will surely delight all who taste it. Enjoy the smiles and laughter around the table—happy cooking!
PrintIce Cream Sandwich Cake
A delightful layered dessert made of ice cream sandwiches, whipped topping, and hot fudge, perfect for summer gatherings.
- Prep Time: 15 minutes
- Cook Time: 0 minutes
- Total Time: 135 minutes
- Yield: 12 servings 1x
- Category: Dessert
- Method: Freezing
- Cuisine: American
- Diet: Vegetarian
Ingredients
- 12 ice cream sandwiches
- 1 tub (8 oz) whipped topping, thawed
- 1 cup hot fudge sauce
- 1 cup crushed cookies (e.g., Oreos or chocolate wafer cookies)
- Sprinkles or chocolate shavings for garnish
Instructions
- Assemble the First Layer of Ice Cream Sandwiches: Arrange half of the ice cream sandwiches in a 9×13 inch baking dish, creating a solid base for your cake.
- Spread the Whipped Topping: Spread half of the whipped topping evenly over the sandwiches, adding a fluffy layer of sweetness.
- Drizzle the Hot Fudge Sauce: Drizzle half of the hot fudge sauce over the whipped topping, allowing the rich chocolate to sink in slightly.
- Repeat the Layers: Repeat the process with the remaining ice cream sandwiches, spreading the last bit of whipped topping, followed by the final drizzle of hot fudge sauce.
- Add Crunch and Color: Top it off with a generous sprinkle of crushed cookies and colorful sprinkles or chocolate shavings to create a festive look.
- Freeze to Perfection: Cover the dish and freeze for at least 120 minutes before serving. This helps solidify all the layers into one cohesive and delicious cake.
- Slice and Enjoy!: Once it’s fully frozen, slice into squares and serve up happiness on a plate!
Notes
Use any flavor of ice cream sandwiches you love—cookie dough, mint chocolate chip, or classic vanilla. Pair with fresh fruit or extra fudge sauce for serving.
Nutrition
- Serving Size: 1 serving
- Calories: 245
- Sugar: 16g
- Sodium: 135mg
- Fat: 10g
- Saturated Fat: 5g
- Unsaturated Fat: 5g
- Trans Fat: 0g
- Carbohydrates: 36g
- Fiber: 1g
- Protein: 2g
- Cholesterol: 5mg